The Right Way to Upload Files to S3 from a Serverless Backend
Learn why the traditional Node.js + Multer approach doesn’t scale, and how presigned URLs make file uploads to Amazon S3 faster, cheaper, and secure.
👋 Hey there! I'm a passionate developer with a knack for creating robust and user-friendly applications. My expertise spans across various technologies, including TypeScript, JavaScript, SolidJS, React, NextJS.
Introduction
File uploads sound simple — until you try doing them in a serverless environment. Suddenly your “tiny upload feature” feels like it’s eating half your cloud budget.
On a normal server, you can just accept a file, push it to Amazon S3, and call it a day. But serverless backends (like AWS Lambda, Vercel Functions, or Netlify Functions) aren’t meant to babysit your uploads. They’re sprinters, not marathon runners.
That means:
Timeouts (big files take longer than your function’s max execution time).
High costs (you pay for every second your backend is stuck watching progress bars).
Unnecessary complexity (your backend turns into a middleman with trust issues).
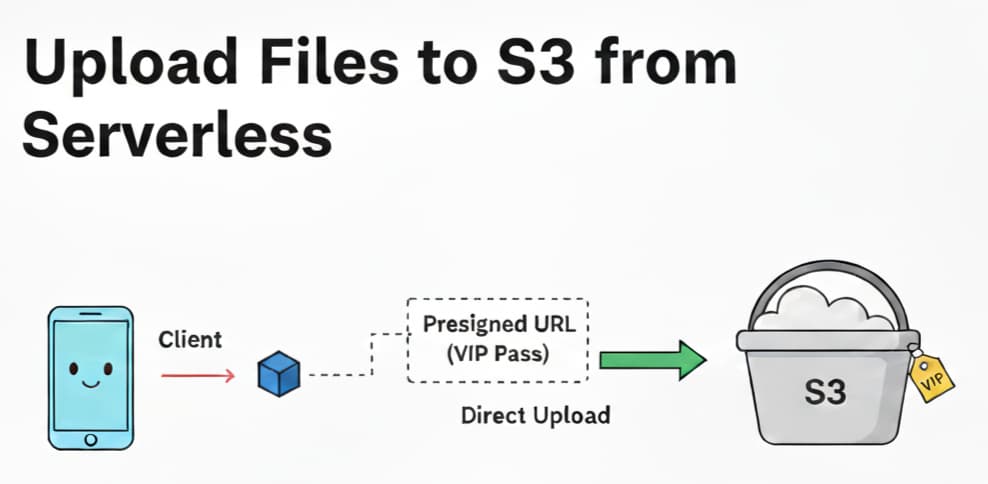
The good news? There’s a better way. Instead of playing “file courier,” let your backend hand out a VIP pass (presigned URL) so clients can walk right into S3 themselves.
Traditional Approach: Uploading Through Backend
Here’s the old-school method:
Client uploads a file to your backend.
Backend temporarily holds it (like an awkward third wheel).
Backend uploads it to S3.
A simple Node.js + Multer setup might look like this:
// server.js
import express from "express";
import multer from "multer";
import { S3Client, PutObjectCommand } from "@aws-sdk/client-s3";

const app = express();
const upload = multer({ storage: multer.memoryStorage() });
const s3 = new S3Client({
  credentials: {
    accessKeyId: process.env.ACCESS_KEY_ID,
    secretAccessKey: process.env.SECRET_ACCESS_KEY,
  },
  region: process.env.AWS_REGION,
});

app.post("/upload", upload.single("file"), async (req, res) => {
  const params = {
    Bucket: process.env.S3_BUCKET,
    Key: req.file.originalname,
    Body: req.file.buffer,
  };
  const params = {
    Bucket: process.env.S3_BUCKET,
    Key: req.file.originalname,
    Body: req.file.buffer,
    ContentType: req.file.mimetype,
  };

  try {
    const command = new PutObjectCommand(params);
    await s3Client.send(command);

    res.json({ message: "File uploaded successfully" });
  } catch (err) {
    res.status(500).json({ error: err.message });
  }
});

app.listen(3000);
Flow: Client → Backend → S3
The problems are obvious:
Scalability → Large files keep your serverless function awake way past its bedtime.
Costs → You’re billed while your backend plays middleman.
Bottleneck → Every upload has to squeeze through your backend first.
This is fine… until someone uploads a 2GB video. Then it’s not fine.
Alternative: External Upload Service
Some developers think: “Fine, I’ll just build a separate backend just for uploads!”
That means:
Spinning up EC2, ECS, or a dedicated Node server.
Letting it handle streams and send them to S3.
Pros:
Offloads work from your serverless functions.
Can be tuned for file streaming.
Cons:
You’ve now adopted another backend baby to feed and maintain.
Public upload endpoints can be dangerous if not locked down.
Still, your backend is just a fancier middleman.
So yes, this works — but it’s like renting a moving truck to deliver a pizza.
The Right Way: Using Presigned URLs
Enter the hero: presigned URLs.
Here’s the magic:
Client asks your backend for permission to upload.
Backend generates a presigned URL from S3.
Client uploads directly to S3.
Backend never touches the file. Everyone’s happy.
Backend: Generate Presigned URL
// getUploadUrl.js
import { S3Client, PutObjectCommand } from "@aws-sdk/client-s3";
import { getSignedUrl } from "@aws-sdk/s3-request-presigner";

const s3 = new S3Client({
  credentials: {
    accessKeyId: process.env.ACCESS_KEY_ID,
    secretAccessKey: process.env.SECRET_ACCESS_KEY,
  },
  region: process.env.AWS_REGION,
});

export async function getUploadUrl(filename, fileType) {
  const command = new PutObjectCommand({
    Bucket: process.env.S3_BUCKET,
    Key: filename,
    ContentType: fileType,
  });

  return await getSignedUrl(s3, command, { expiresIn: 60 }); // 60s VIP pass
}
Your backend responds with:
{
  "url": "https://your-bucket.s3.amazonaws.com/file.png?...",
  "key": "file.png"
}
Frontend: Upload File
async function uploadFile(file) {
  // 1. Ask backend for presigned URL
  const res = await fetch("/api/upload-url", {
    method: "POST",
    body: JSON.stringify({ filename: file.name, fileType: file.type }),
    headers: { "Content-Type": "application/json" },
  });
j
  const { url } = await res.json();

  // 2. Upload directly to S3
  await fetch(url, {
    method: "PUT",
    headers: { "Content-Type": file.type },
    body: file,
  });

  alert("Upload successful!");
}
It’s like your backend saying: “Here’s your one-time backstage pass, don’t lose it. Now go talk to S3 directly.”
Benefits of Presigned URLs
Why this approach wins:
No long-running backend requests → functions return fast.
Scalable → clients upload big files directly to S3.
Secure → presigned URLs expire quickly and can restrict file type/size.
Flexible → works with private buckets.
Cheaper → backend isn’t wasting execution time watching progress bars.
Basically, presigned URLs let your backend do what it does best: hand out keys, not carry boxes.
Conclusion
We compared three approaches:
Traditional backend upload → works for small files, cries with big ones.
Dedicated upload service → better, but extra work to maintain.
Presigned URLs → simple, secure, scalable, and cost-friendly.
If you’re building on a serverless backend, presigned URLs are the right way to upload files to S3.
Happy coding!