Building an Infinite Scroll FlatList Component in ReactJS: A Comprehensive Guide
Enhance Your Web Application with Efficient Data Handling and Smooth User Experience Using a Custom FlatList Component

👋 Hey there! I'm a passionate developer with a knack for creating robust and user-friendly applications. My expertise spans across various technologies, including TypeScript, JavaScript, SolidJS, React, NextJS.
Introduction
A FlatList is a performant interface for rendering large lists of data. Commonly used in mobile applications, especially in React Native, Flatlist components help in managing complex lists efficiently. This article will guide you through creating a FlatList-like component in a web application using ReactJS.
Setting Up the Project
First, we’ll create a new React project using Vite and set up Tailwind CSS for styling. Follow these steps:
1. Create React Project:
pnpm create vite@latest react-flatlist
2. Navigate to the project directory and install dependencies:
cd react-flatlist
pnpm install
3. Install Tailwind CSS:
pnpm add -D tailwindcss postcss autoprefixer
pnpm dlx tailwindcss init -p
4. Configure Tailwind CSS:
Update tailwind.config.js:
export default {
  // replace this
  content: ["./index.html", "./src/**/*.{js,ts,jsx,tsx}"],
  // your other configs
  theme: {
    extend: {},
  },
  plugins: [],
}
5. Add Tailwind CSS Directives:
Add these lines to the top of your index.css file:
@tailwind base;
@tailwind components;
@tailwind utilities;
6. Install Axios:
pnpm add axios
7. Run the Project:
pnpm dev
Now, your React project is set up with
Tailwind CSSfor styling andaxiosfor easy data fetching. You’re ready to start building the Flatlist Component!
Creating the Flatlist Component
1. Import Required Dependencies and Define Props Interface
In src/components/FlatList.tsx, import the necessary modules and define the interface for the props:
import { Fragment, Key, ReactNode, useCallback, useEffect } from "react";

interface ListProps<T> {
 data: T[];
 keyExtractor: (item: T) => Key;
 renderItem: (item: T) => ReactNode;
 ItemSeparatorComponent?: () => ReactNode;
 ListFooterComponent?: () => ReactNode;
 onEndReached?: () => void;
 onEndReachedThreshold?: number;
}
2. Create the FlatList Component
Implement the FlatList component using the provided structure:
const FlatList = <T,>({
 data,
 keyExtractor,
 renderItem,
 ItemSeparatorComponent,
 ListFooterComponent,
 onEndReached,
 onEndReachedThreshold = 0.5,
}: ListProps<T>) => {
 const handleScroll = useCallback(() => {
  const { scrollTop, scrollHeight, clientHeight } = document.documentElement;

  if (scrollTop + clientHeight >= scrollHeight - onEndReachedThreshold) {
   if (onEndReached) onEndReached();
  }
 }, [onEndReached, onEndReachedThreshold]);

 useEffect(() => {
  window.addEventListener("scroll", handleScroll);
  return () => window.removeEventListener("scroll", handleScroll);
 }, [handleScroll]);

 return (
  <>
   {data.map((item, index) => (
    <Fragment key={keyExtractor(item)}>
     {renderItem(item)}
     {ItemSeparatorComponent && index < data.length - 1 && <ItemSeparatorComponent />}
    </Fragment>
   ))}
   {ListFooterComponent && <ListFooterComponent />}
  </>
 );
};

export default FlatList;
Using the FlatList Component
1. Basic FlatList Rendering
In your App.tsx, import and use the FlatList component and render demo data:
import FlatList from "./components/FlatList";

type Item = { id: number; title: string };

const data = Array.from({ length: 100 }).map((_, index) => ({ id: index + 1, title: `Item ${index + 1}` }));

const App = () => {
 const renderItem = (item: Item) => <div>{item.title}</div>;
 const keyExtractor = (item: { id: number }) => item.id;

 return (
  <div className="space-y-4 max-w-2xl mx-auto w-full">
   <h1 className="mt-4 text-3xl font-bold text-center">React FlatList</h1>

   <FlatList data={data} renderItem={renderItem} keyExtractor={keyExtractor} />
  </div>
 );
};

export default App;
2. Check the Browser:
Open your browser and navigate to the local server (usually http://localhost:5173). You should see the heading ‘React FlatList’, followed by 100 list items.
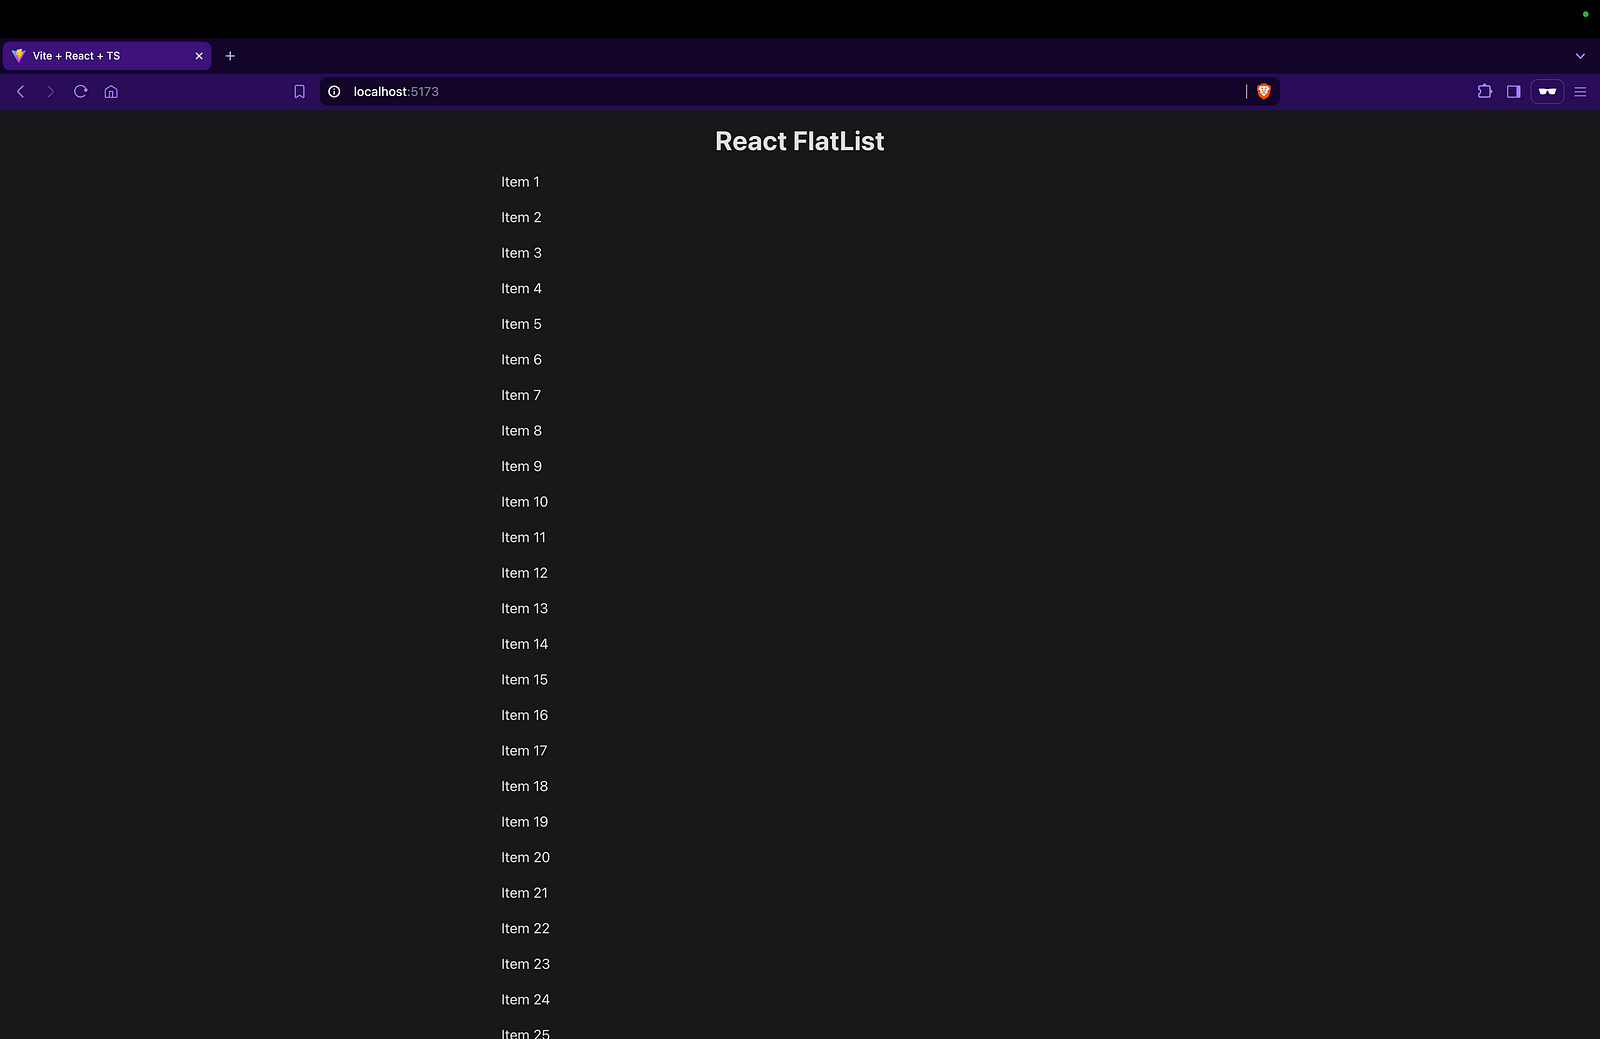
This confirms that your project setup with
Tailwind CSSand theFlatListcomponent is rendering the items. Now you’re ready to implement the full features ofFlatListcomponent!
Handling Data
1. Fetching Data
Modify the App.tsx to fetch data from an API or use mock data. Let's use the JSONPlaceholder API to get some todos and display them in the list.
- First, define the
Todotype:
type Todo = { id: number; title: string; completed: boolean; userId: number };
- Define a
todosstate:
const [todos, setTodos] = useState<Todo[]>([]);
- Write the function to fetch the todos
const fetchData = useCallback(async () => {
 try {
  const { data } = await axios.get("https://jsonplaceholder.typicode.com/todos");

  setTodos(data);
 } catch (error) {
  console.log("error", error);
 }
}, []);
Wrapping the fetch function with
useCallbackis necessary to ensure it doesn’t recreate the function on every render, which could cause unnecessary re-renders or re-fetches.
- Fetch Data on Component Mount
Use useEffect to fetch data when the component mounts.
useEffect(() => {
 fetchData();
}, [fetchData]);
- Pass Todos to the FlatList Component
<FlatList
 data={todos}
 renderItem={renderItem}
 keyExtractor={keyExtractor}
 ItemSeparatorComponent={ItemSeparatorComponent}
/>
- Style the
renderItemandItemSeparatorComponent
const renderItem = (item: Todo) => (
 <div className="bg-slate-900 rounded-lg overflow-hidden flex flex-col justify-between">
  <div className="px-5 py-8 flex items-center gap-4">
   <p>{item.id})</p>
   <h2 className="text-2xl capitalize">{item.title}</h2>
  </div>
  <div className="bg-slate-600 py-2">
   <p className="text-center">{item.completed ? "Completed" : "Not completed"}</p>
  </div>
 </div>
);

const ItemSeparatorComponent = () => <div className="my-1 h-[1px] border-t border-t-zinc-700 border-dashed" />;
2. Whole App Component
Here’s the complete code for the App component:
import { useCallback, useEffect, useState } from "react";
import axios from "axios";
import FlatList from "./components/FlatList";

type Todo = { id: number; title: string; completed: boolean; userId: number };
const App = () => {
 const [todos, setTodos] = useState<Todo[]>([]);

 const fetchData = useCallback(async () => {
  try {
   const { data } = await axios.get("https://jsonplaceholder.typicode.com/todos");

   setTodos(data);
  } catch (error) {
   console.log("error", error);
  }
 }, []);

 useEffect(() => {
  fetchData();
 }, [fetchData]);

 const renderItem = (item: Todo) => (
  <div className="bg-slate-900 rounded-lg overflow-hidden flex flex-col justify-between">
   <div className="px-5 py-8 flex items-center gap-4">
    <p>{item.id})</p>
    <h2 className="text-2xl capitalize">{item.title}</h2>
   </div>
   <div className="bg-slate-600 py-2">
    <p className="text-center">{item.completed ? "Completed" : "Not completed"}</p>
   </div>
  </div>
 );

 const ItemSeparatorComponent = () => <div className="my-1 h-[1px] border-t border-t-zinc-700 border-dashed" />;

 const keyExtractor = (item: { id: number }) => item.id;

 return (
  <div className="space-y-4 max-w-2xl mx-auto w-full">
   <h1 className="mt-4 text-3xl font-bold text-center">React FlatList</h1>

   <FlatList
    data={todos}
    renderItem={renderItem}
    keyExtractor={keyExtractor}
    ItemSeparatorComponent={ItemSeparatorComponent}
   />
  </div>
 );
};

export default App;

Now, when you run the project and view it in your browser, you should see a list of todos displayed in your browser.
Adding Pagination to the FlatList Component
In this section, we’ll enhance our FlatList component by adding pagination, allowing the list to load more items as you scroll down. We'll use constants to manage the number of items per page, total items, and the threshold for triggering the end-of-list event.
1. Define Constants
First, let’s define some constants for our component:
const ITEM_PER_PAGE = 10;
const TOTAL_ITEMS = 200;
const ON_END_REACHED_THRESHOLD = 0.2;
2. Define States and a Ref
Next, we’ll define the states for managing the current page, the loading state, and a ref to track the initial render:
const [page, setPage] = useState(1);
const [hasMore, setHasMore] = useState(true);
const [isLoading, setIsLoading] = useState(false);

const initialRender = useRef(true); // Ref to track the initial render
3. Modify the fetchData Function
We’ll update the fetchData function to handle pagination. This function will fetch data based on the current page and append it to the existing list:
const fetchData = useCallback(async () => {
  setIsLoading(true);

  try {
    const { data } = await axios.get(`https://jsonplaceholder.typicode.com/todos?_limit=${ITEM_PER_PAGE}&_page=${page}`);

    setTodos(prevData => {
      const todos = [...prevData, ...data];

      if (todos.length >= TOTAL_ITEMS) {
        setHasMore(false);
      }

      return todos;
    });
  } catch (error) {
    console.log("error", error);
  } finally {
    setIsLoading(false);
  }
}, [page]);
4. Modify the useEffect
We’ll modify the useEffect to call fetchData only if there are more items to load:
useEffect(() => {
  if (initialRender.current) {
    initialRender.current = false;
    return;
  }
  if (hasMore) {
    fetchData();
  }
}, [fetchData, hasMore]);
5. Add the ListFooterComponent
We’ll add a ListFooterComponent to display a loading indicator or an end-of-list message:
const ListFooterComponent = () => (
  <>
    {isLoading && <div className="text-center p-5">Loading...</div>}
    {!isLoading && !hasMore && <div className="text-center p-5">End of List</div>}
  </>
);
6. Add the onEndReached Function
The onEndReached function will increment the page number when the end of the list is reached:
const onEndReached = () => {
  if (!isLoading && hasMore) {
    setPage(prevPage => prevPage + 1);
  }
};
7. Pass Additional Props to FlatList
Finally, we’ll pass ListFooterComponent, onEndReached, and ON_END_REACHED_THRESHOLD to the FlatList component:
<FlatList
  data={todos}
  renderItem={renderItem}
  keyExtractor={keyExtractor}
  ItemSeparatorComponent={ItemSeparatorComponent}
  ListFooterComponent={ListFooterComponent}
  onEndReached={onEndReached}
  onEndReachedThreshold={ON_END_REACHED_THRESHOLD}
/>
8. Complete App Component
Here’s the complete App component with all the modifications:
import { useCallback, useEffect, useRef, useState } from "react";
import axios from "axios";
import FlatList from "./components/FlatList";

const ITEM_PER_PAGE = 10;
const TOTAL_ITEMS = 200;
const ON_END_REACHED_THRESHOLD = 0.2;

type Todo = { id: number; title: string; completed: boolean; userId: number };

const App = () => {
 const [todos, setTodos] = useState<Todo[]>([]);
 const [page, setPage] = useState(1);
 const [hasMore, setHasMore] = useState(true);
 const [isLoading, setIsLoading] = useState(false);

 const initialRender = useRef(true); // Ref to track the initial render

 const fetchData = useCallback(async () => {
  setIsLoading(true);

  try {
   const { data } = await axios.get(`https://jsonplaceholder.typicode.com/todos?_limit=${ITEM_PER_PAGE}&_page=${page}`);

   setTodos(prevData => {
    const todos = [...prevData, ...data];

    if (todos.length >= TOTAL_ITEMS) {
     setHasMore(false);
    }

    return todos;
   });
  } catch (error) {
   console.log("error", error);
  } finally {
   setIsLoading(false);
  }
 }, [page]);

 useEffect(() => {
  if (initialRender.current) {
   initialRender.current = false;
   return;
  }
  if (hasMore) {
   fetchData();
  }
 }, [fetchData, hasMore]);

 const renderItem = (item: Todo) => (
  <div className="bg-slate-900 rounded-lg overflow-hidden flex flex-col justify-between">
   <div className="px-5 py-8 flex items-center gap-4">
    <p>{item.id})</p>
    <h2 className="text-2xl capitalize">{item.title}</h2>
   </div>
   <div className="bg-slate-600 py-2">
    <p className="text-center">{item.completed ? "Completed" : "Not completed"}</p>
   </div>
  </div>
 );

 const ItemSeparatorComponent = () => <div className="my-1 h-[1px] border-t border-t-zinc-700 border-dashed" />;

 const ListFooterComponent = () => (
   <>
     {isLoading && <div className="text-center p-5">Loading...</div>}
     {!isLoading && !hasMore && <div className="text-center p-5">End of List</div>}
   </>
 );

 const keyExtractor = (item: { id: number }) => item.id;

 const onEndReached = () => {
  if (!isLoading && hasMore) {
   setPage(prevPage => prevPage + 1);
  }
 };

 return (
  <div className="space-y-4 max-w-2xl mx-auto w-full">
   <h1 className="mt-4 text-3xl font-bold text-center">React FlatList</h1>

   <FlatList
    data={todos}
    renderItem={renderItem}
    keyExtractor={keyExtractor}
    ItemSeparatorComponent={ItemSeparatorComponent}
    ListFooterComponent={ListFooterComponent}
    onEndReached={onEndReached}
    onEndReachedThreshold={ON_END_REACHED_THRESHOLD}
   />
  </div>
 );
};

export default App;
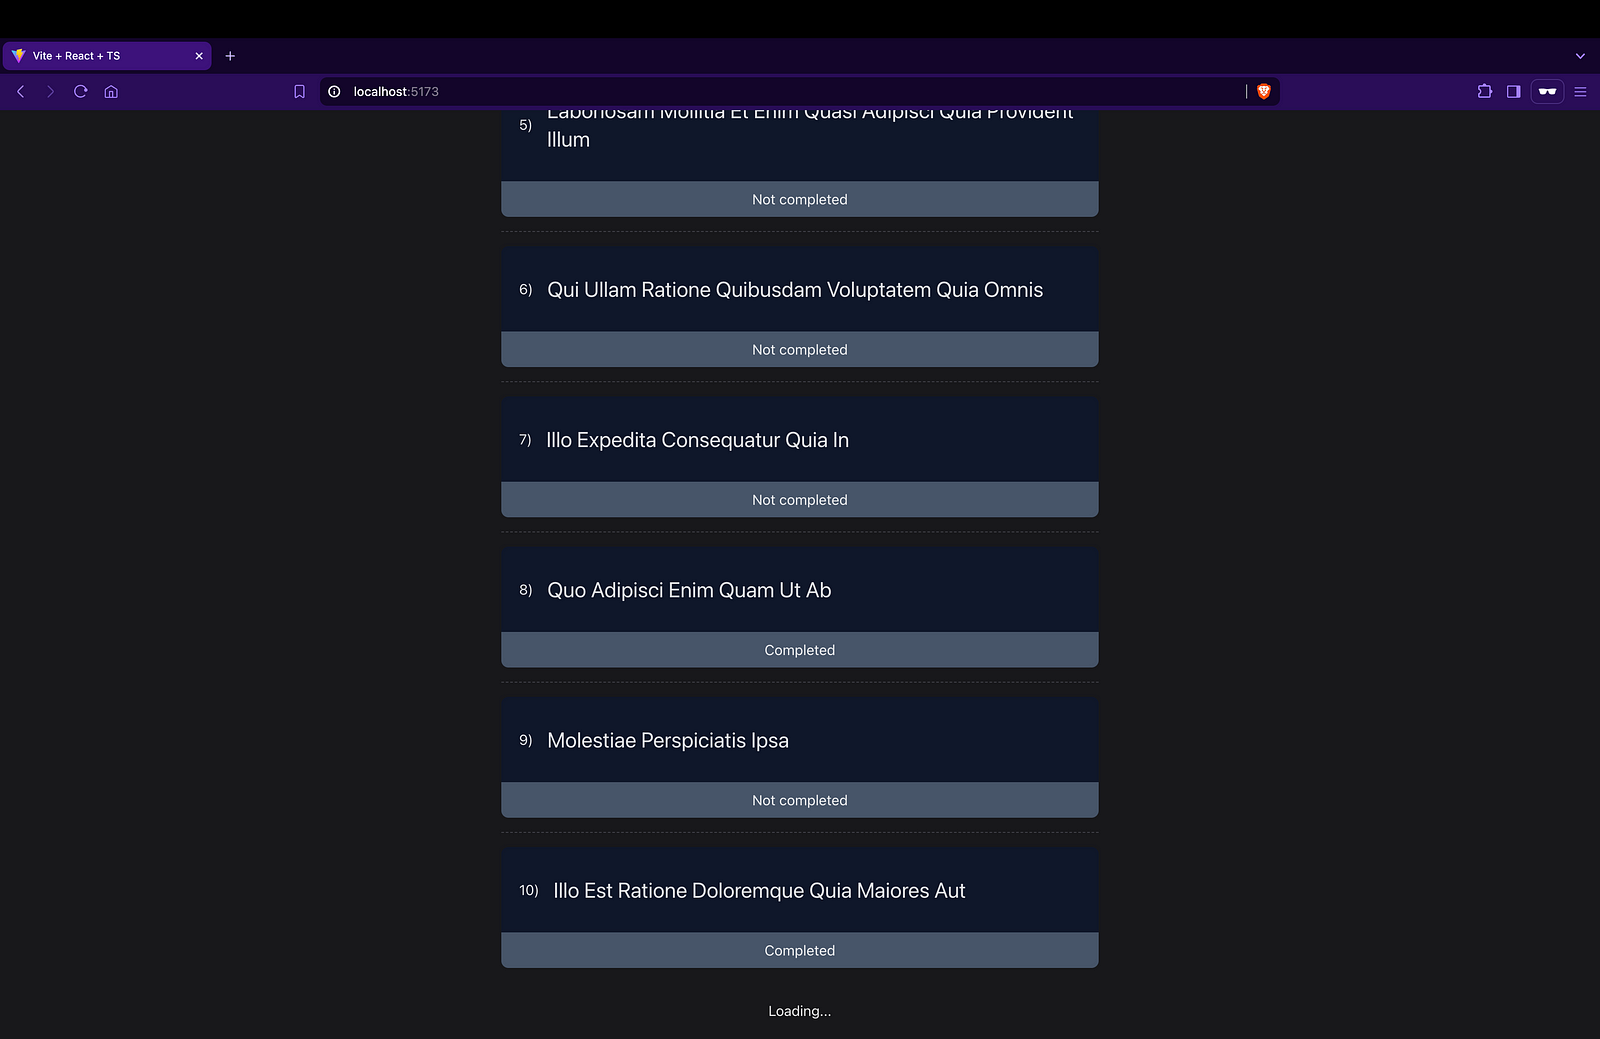
After implementing these changes, you should be able to see the list of todos in your browser. As you scroll to the bottom, more items will load, and a loading indicator will appear. If there are no more items to load, an “End of List” message will be displayed.
Conclusion
Creating a FlatList-like component for a web application using ReactJS is a powerful way to efficiently manage and display large datasets with infinite scrolling. This tutorial walked through building such a component, emphasizing the importance of handling data fetching, pagination, and maintaining a responsive user experience.
Key steps included:
Setting Up the FlatList Component: We created a reusable FlatList component with essential props such as
data,keyExtractor,renderItem,ItemSeparatorComponent,ListFooterComponent,onEndReached, andonEndReachedThreshold.Handling Data Fetching: By utilizing the
useCallbackanduseEffecthooks, we ensured efficient data fetching and updating the state only when necessary.Adding Pagination: We implemented a pagination system that loads more items as the user scrolls down, using constants to manage the number of items per page and the total items.
Enhancing User Experience: The
ListFooterComponentprovided visual feedback to users about the loading state and the end of the list.
By following these steps, you can create a highly customizable and efficient infinite scroll component for any dataset. This approach not only improves the user experience by providing seamless data loading but also enhances performance by loading data incrementally.
Feel free to experiment with different styles and configurations to tailor the FlatList component to your specific needs. Happy coding!